Classify Your Own Dataset
This tutorial will walk through the steps required to finetune a pretrained model on your custom dataset.
The dataset used in this tutorial is from the Plant Seedlings Classification competition on Kaggle. Visit the link to download the dataset.
Creating the Meta ARFF File (ImageDirectoryLoader)
This dataset is uses a common 'folder organised' format - images are sorted into subfolders, with the class name being the subfolder name. This format is intuitive and easy to work with but cannot be loaded directly into WEKA without further processing.
WekaDeeplearning4j now comes with the ImageDirectoryLoader, a simple tool which creates an .arff file from a 'folder organised' dataset.
GUI Usage
The ImageDirectoryLoader can be invoked by selecting a folder instead of a file from the
Open file... menu.
Click Open File... and navigate to the train/ folder in the Plant Seedlings dataset
you just downloaded.
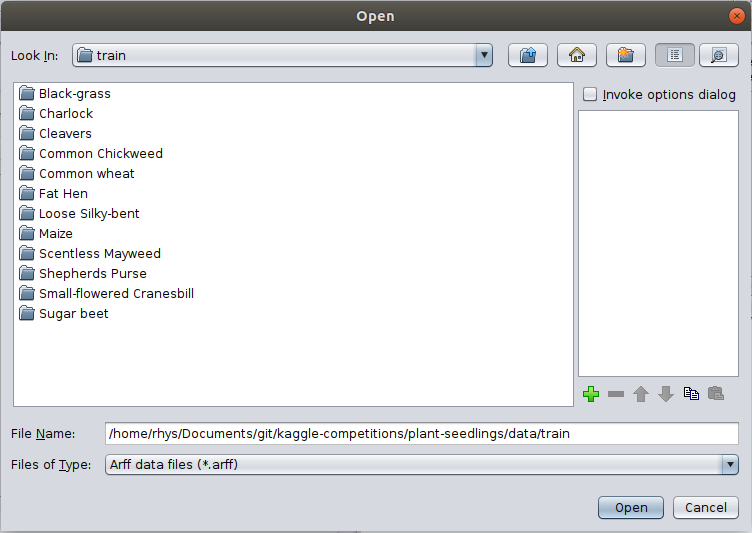
Click Ok and choose the ImageDirectoryLoader in the following popup.
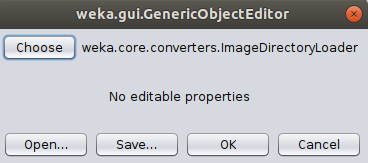
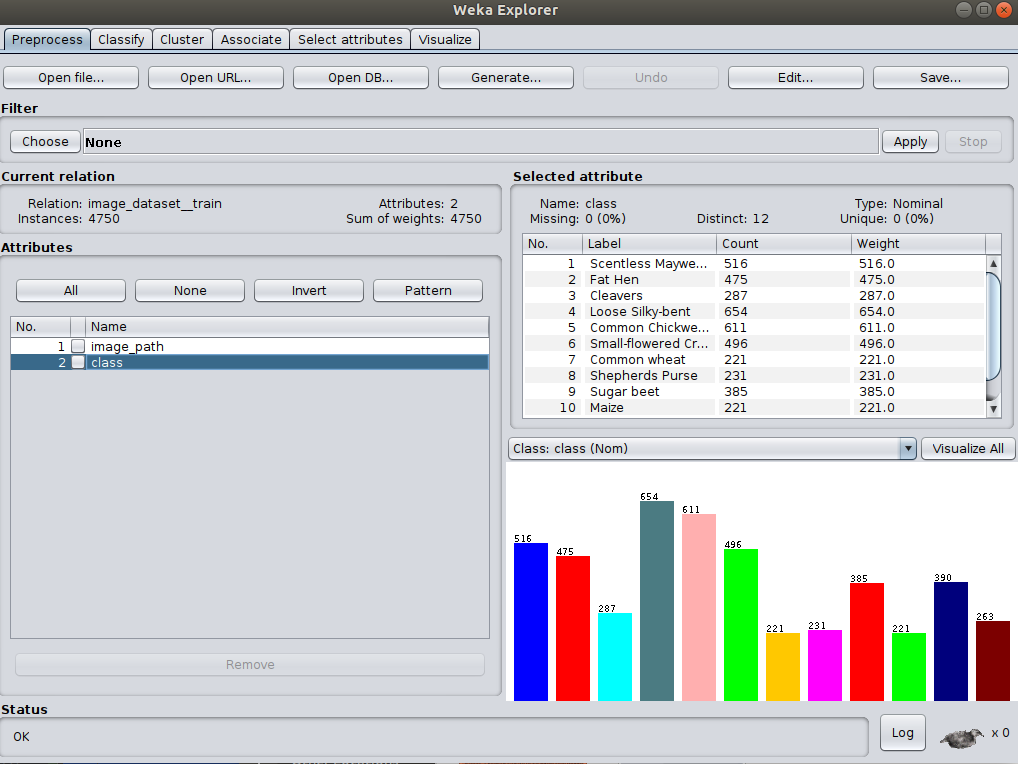
There are no settings to change so simply click OK to run - you should be taken back to the
Preprocess panel with your instances now loaded.
Commandline Usage
The tool can also be run from the command line
java weka.Run .ImageDirectoryLoader -i <input dataset path> -name <output arff filename>
e.g.:
java weka.Run .ImageDirectoryLoader -i /path/to/plant-seedlings/data/train -name plant-seedlings-train.arff
The associated meta .arff file has been created inside the input directory specified. As we're simply checking accuracy within WEKA, we won't load in the test/ data and submit it to Kaggle - that is outside the scope of this tutorial.
Important note: The newly created arff dataset contains two features, the first one being the filename and the second one being the class. Therefore it is necessary to define an ImageInstanceIterator (in Dl4jMlpFilter or Dl4jMlpClassifier) which uses these filenames in the directory given by the option -imagesLocation.
Training - GUI
The first step is to open the plant seedlings instances as shown earlier.
In the next step, the Dl4jMlpClassifier has to be selected as Classifier in the Classify tab. A click on the classifier will open the configuration window
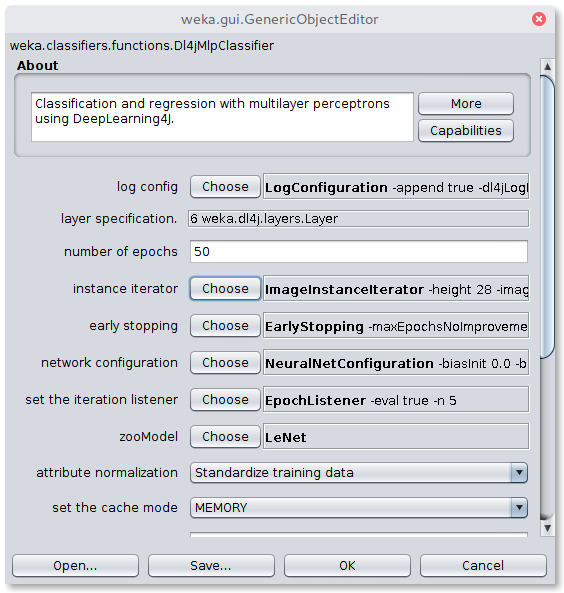
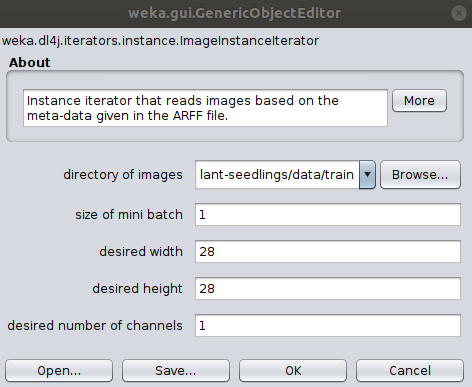
To correctly load the images it is further necessary to select the Image-Instance-Iterator as instance iterator
and set the images location to the train/ directory in the Plant Seedlings dataset folder.
We'll be using a pretrained model (which has a fixed input size) so the width, height, and number of channels don't need to be set.
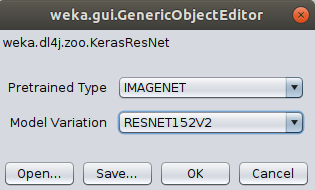
For the sake of this tutorial, we'll use a pretrained Keras ResNet152V2 model. Select KerasResNet from the zooModel option.
The default variation is RESNET50, so we'll change that to RESNET152V2.
Note that by default, the layer specification is not loaded in the GUI for usability reasons;
loading the layers every time an option is changed can slow down the GUI significantly. If, however, you'd like
to view the layers of the zoo model you've selected, set the Load layer specification in GUI flag to true.
A holdout evaluation strategy has to be selected in the Test options box via Percentage split,
which can be set to 66% for a 2/3 - 1/3 split. The classifier training is now ready to be started with the Start button.
The resulting classifier evaluation can be examined in the Classifier output box. Here, an evaluation summary is shown for the training and testing split.
The above setup, trained for 20 epochs with a batch size of 16 produces a classification accuracy of 94.51% on the test data.
Correctly Classified Instances        1497               94.5076 %
Incorrectly Classified Instances        87                5.4924 %
Kappa statistic                          0.9392
Mean absolute error                      0.01
Root mean squared error                  0.0894
Relative absolute error                  6.6502 %
Root relative squared error             32.5587 %
Total Number of Instances             1584

=== Confusion Matrix ===

   a   b   c   d   e   f   g   h   i   j   k   l   <-- classified as
  44   0   0   0   6   0  38   0   0   0   0   0 |   a = Black-grass
   0 128   0   0   0   1   0   0   0   1   0   0 |   b = Charlock
   0   0  92   2   0   0   0   0   0   0   0   2 |   c = Cleavers
   0   1   0 202   0   0   1   0   0   0   0   0 |   d = Common Chickweed
   2   0   0   0  69   0   2   0   0   0   0   1 |   e = Common wheat
   1   0   1   0   1 154   0   0   0   0   0   1 |   f = Fat Hen
  11   0   0   0   0   0 206   0   1   0   0   0 |   g = Loose Silky-bent
   0   0   0   0   0   0   3  71   0   0   0   0 |   h = Maize
   1   0   0   0   0   0   0   0 171   0   0   0 |   i = Scentless Mayweed
   0   0   0   1   0   0   0   0   5  71   0   0 |   j = Shepherds Purse
   0   0   0   0   0   0   1   0   0   0 164   0 |   k = Small-flowered Cranesbill
   0   1   0   2   0   0   0   0   0   0   0 125 |   l = Sugar beet
Training - Commandline
Ensure weka.jar is on the classpath. The following run finetunes a pretrained ResNet model for 20 epochs. This shows how to specify a non-default variation from the command line.
$ java weka.Run \
    .Dl4jMlpClassifier \
    -S 1 \
    -iterator ".ImageInstanceIterator -imagesLocation plant-seedlings/data/train -bs 16" \
    -normalization "Standardize training data" \
    -zooModel ".KerasResNet -variation RESNET152V2" \
    -config "weka.dl4j.NeuralNetConfiguration -updater \"weka.dl4j.updater.Adam -lr 0.1\"" \
    -numEpochs 20 \
    -t plant-seedlings/data/train/plant-seedlings-train.arff \
    -split-percentage 66
Java
The same architecture can be built programmatically with the following Java code
// Load all packages so that Dl4jMlpClassifier class can be found using forName("weka.filters.unsupervised.attribute.Dl4jMlpClassifier")
weka.core.WekaPackageManager.loadPackages(true);

// Load the dataset
weka.core.Instances data = new weka.core.Instances(new FileReader("/home/rhys/Documents/git/kaggle-competitions/plant-seedlings/data/train/output.arff"));
data.setClassIndex(data.numAttributes() - 1);
String[] classifierOptions = weka.core.Utils.splitOptions("-iterator \".ImageInstanceIterator -imagesLocation /home/rhys/Documents/git/kaggle-competitions/plant-seedlings/data/train -bs 16\" -zooModel \"weka.dl4j.zoo.KerasResNet -variation RESNET152V2\" -config \"weka.dl4j.NeuralNetConfiguration -updater \\\"weka.dl4j.updater.Adam -lr 0.1\\\"\" -numEpochs 20");
weka.classifiers.AbstractClassifier myClassifier = (AbstractClassifier) weka.core.Utils.forName(weka.classifiers.AbstractClassifier.class, "weka.classifiers.functions.Dl4jMlpClassifier", classifierOptions);

// Stratify and split the data
Random rand = new Random(0);
Instances randData = new Instances(data);
randData.randomize(rand);
randData.stratify(5);
Instances train = randData.trainCV(5, 0);
Instances test = randData.testCV(5, 0);

// Build the classifier on the training data
myClassifier.buildClassifier(train);

// Evaluate the model on test data
Evaluation eval = new Evaluation(test);
eval.evaluateModel(myClassifier, test);

// Output some summary statistics
System.out.println(eval.toSummaryString());
System.out.println(eval.toMatrixString());