Dl4j Model Inference Panel
WekaDeeplearning4j includes a new Dl4j Inference panel, which allows you to easily
run inference on images using either the built-in Model Zoo
or a custom trained Dl4jMlpClassifier model. This panel doesn't require you to load
an entire .arff dataset, so it's great for quick experimentation and prototyping.
For more in-depth experimentation, WekaDeeplearning4j allows you to generate a saliency map when running inference on an image. The map can show what part of the image the model is 'looking' at to make its prediction.
This tutorial walks through a few common usage scenarios with the panel, including simple inference and more advanced saliency map generation.
Where the examples below use an image, this can be found at:
$WEKA_HOME/packages/wekaDeeplearning4j/src/test/resources/images/
Example 1: Simple Inference with Default Parameters
The package has set reasonable default values for simple inference on images of everyday objects (animals, food, vehicles, etc.).
This example uses the built-in Dl4jResNet50 model (pretrained
on IMAGENET) to perform prediction on your image.
GUI
After switching to the Dl4j Inference panel, we'll need to open an image
to run prediction on. We'll use pufferfish.jpg for this example (see above for full path),
although you can use any image saved to your machine.
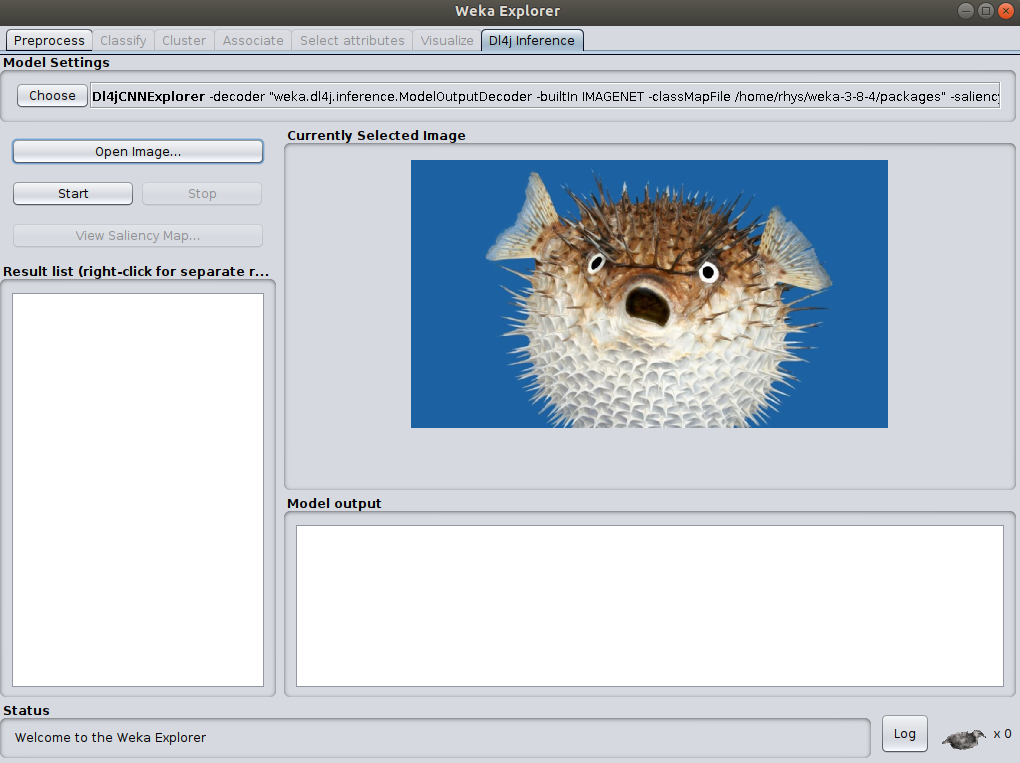
To run inference on the image, simply click Start. After a brief pause you should see the
prediction results below the image:
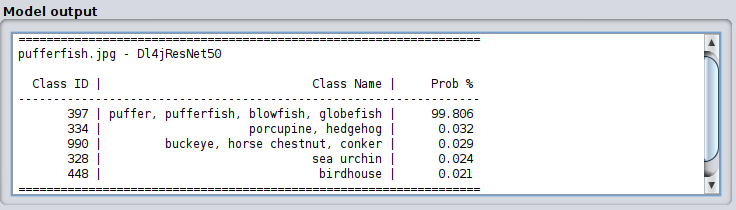
As we can see the model (Dl4jResNet50) has successfully predicted the image as that of a Pufferfish!
Command Line
The model explorer can also be run from a command-line interface:
$ java weka.Run .Dl4jCNNExplorer \
    -i $WEKA_HOME/packages/wekaDeeplearning4j/src/test/resources/images/pufferfish.jpg
==================================================================
pufferfish.jpg - Dl4jResNet50

  Class ID |                              Class Name |     Prob %
------------------------------------------------------------------
       397 | puffer, pufferfish, blowfish, globefish |     99.806
       334 |                     porcupine, hedgehog |      0.032
       990 |         buckeye, horse chestnut, conker |      0.029
       328 |                              sea urchin |      0.024
       448 |                               birdhouse |      0.021
==================================================================
Example 2: Simple Inference with Custom Parameters
The previous example showed how with absolutely no configuration we can run a pretrained deep learning
model, but we may want to configure the model a little further. This example shows how to use
the VGG16 model (pretrained on the VGGFACE dataset) to perform celebrity prediction.
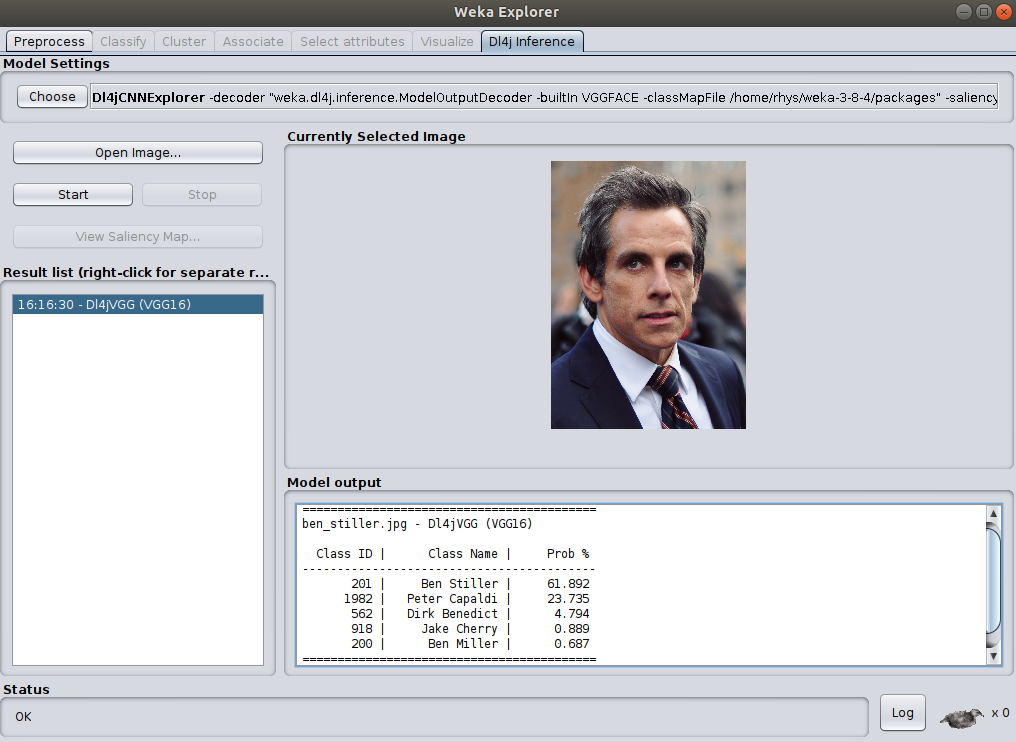
For the purposes of this tutorial, we'll use an image of Ben Stiller (ben_stiller.jpg)
to perform prediction on.
On the Dl4j Inference panel, open the Dl4jCNNExplorer settings:
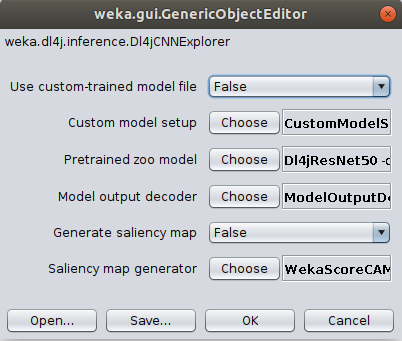
- Choose
Dl4jVGGas thePretrained zoo model.- Open the
Dl4jVGGsettings and change thePretrained TypefromIMAGENETtoVGGFACE.
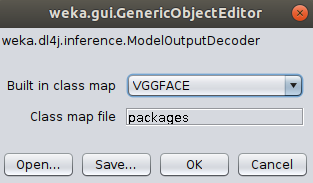
- Open the
- Open the
ModelOutputDecodersettings and changeBuilt in class mapfromIMAGENETtoVGGFACE.

- Click
OkandStartto run the newly configured model on our image of Ben Stiller. You should see the results in the output panel, again correctly predicting the target class.
Command Line
$ java weka.Run .Dl4jCNNExplorer \
    -decoder ".ModelOutputDecoder -builtIn VGGFACE" \
    -zooModel ".Dl4jVGG -variation VGG16 -pretrained VGGFACE" \
    -i $WEKA_HOME/packages/wekaDeeplearning4j/src/test/resources/images/ben_stiller.jpg
==========================================
ben_stiller.jpg - Dl4jVGG (VGG16)

  Class ID |      Class Name |     Prob %
------------------------------------------
       201 |     Ben Stiller |     61.892
      1982 |   Peter Capaldi |     23.735
       562 |   Dirk Benedict |      4.794
       918 |     Jake Cherry |      0.889
       200 |      Ben Miller |      0.687
==========================================
Example 3: Simple Inference with Custom Trained Model
Although a very diverse dataset (IMAGENET) was used to train many of the built-in zoo models
(meaning they can perform accurate prediction in a wide range of domains),
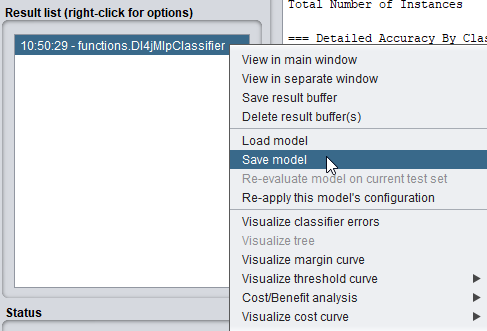
you may instead have a custom-trained Dl4jMlpClassifier
(e.g., using this tutorial, refer to image below on model saving)
which you'd like to experiment with; the process is largely the same as above, with a few minor changes.
GUI
On the Dl4j Inference panel, open the Dl4jCNNExplorer settings:
- Set
Use custom-trained model filetoTrue - Open the
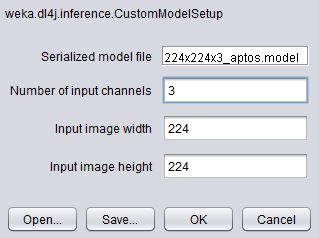
CustomModelSetupsettings- Select your previously saved
.modelfile as theSerialized model file - Set the input
channels,width, andheightwith the values used to train the model. These values will be identical to those set on theImageInstanceIterator.
- Select your previously saved
- Open the
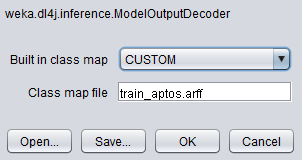
ModelOutputDecodersettings:- Set
Built in class maptoCUSTOM - Select the
Class map fileon your machine. This can be in two forms:.txt- Each class is placed on a new line (example below).arff- The.arfffile used to train the model can be selected; the classes will be parsed from this.
- Set
Sample classmap.txt for the Plant Seedlings dataset
Scentless Mayweed
Fat Hen
Cleavers
Loose Silky-bent
Common Chickweed
Small-flowered Cranesbill
Common wheat
Shepherds Purse
Sugar beet
Maize
Charlock
Black-grass
Just like the previous examples, the custom model can perform inference on any image, although for meaningful results you should run it on images in the domain it was trained on - a model trained to classify between different dog breeds isn't going to give accurate answers when given a chest x-ray!
Command Line
This example uses a custom-trained model which used an ImageInstanceIterator using
channels, width, and height of 3, 56, 56, respectively. These values are explicitly
defined in the CustomModelSetup.
$ java weka.Run .Dl4jCNNExplorer \
    -i path/to/image.jpg \
    -custom-model ".CustomModelSetup -channels 3 -height 56 -width 56 -model-file path/to/customModel.model" \
    -decoder ".ModelOutputDecoder -builtIn CUSTOM -classMapFile path/to/training.arff" \
    -useCustomModel
Example 4: Saliency Map Generation
After running prediction on your image, you may be left wondering what specifically the model was looking at to make its prediction - a saliency map can help explain this.
WekaDeeplearning4j currently contains the ScoreCAM saliency map generation technique, which essentially copies the original image hundreds of times, masks each image differently, measures how strong the model predicts the target class for each masked image, and uses this to create a weighted combination. The idea being that masked images showing important parts of the image will produce a strong signal for the target class and therefore be weighted more heavily.
Because the model must perform inference on hundreds of images, the process can take much longer than simple prediction (2-3 minutes). This can be sped up with the use of a modern GPU (setup instructions)
For the purpose of this tutorial, we'll use ResNet 101 to perform prediction and generate the saliency map.
GUI
- In the
Dl4jCNNExplorersettings, setGenerate Saliency Maptotrue. - Set
Use serialized model filetoFalse - Open the
WekaScoreCAMsettings and setBatch sizeto 8 (or your number of CPU cores).- This allows batches of masked images to be passed through the model, decreasing saliency map generation time.
- Choose
KerasResNetas thePretrained zoo modeland set theModel VariationtoRESNET101. - Ensure the
ModelOutputDecoderis usingIMAGENETas the built-in classmap.
From the tutorial image folder, open catAndDog.jpg, then click Start to begin processing.
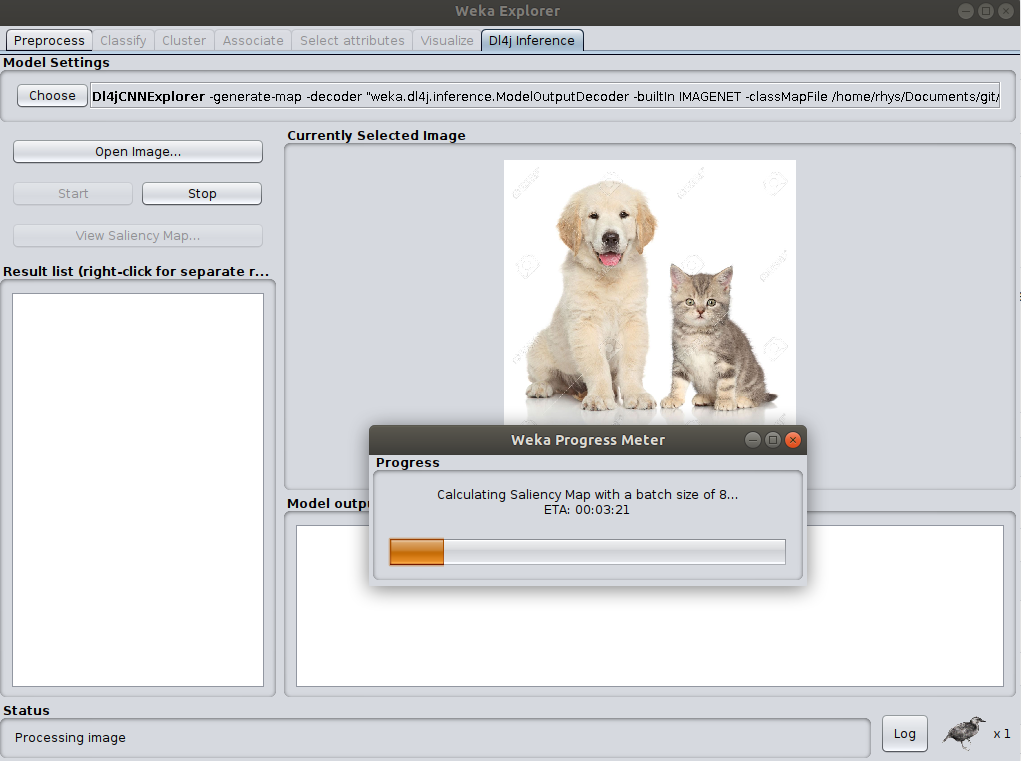
After processing is finished, you should see the predictions in the Model Output panel,
and the Saliency Map Viewer window will automatically open (or click View Saliency Map...).
The default target class is the highest probability prediction (in this case Golden Retriever).
Click Generate to generate the saliency map for this target class.
The saliency map will be displayed (center) as well as superimposed on the original image (right):
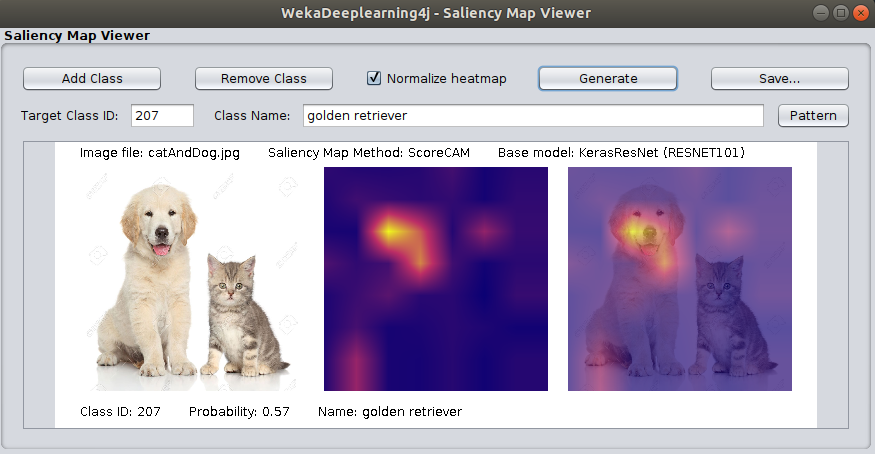
As we can see, the model is focusing on the dog for its prediction.
Multiple Target Classes
The saliency map viewer allows you to select multiple target classes and display them alongside each other.
- Click
Add Classto add another target class. - We now want to target the cat separately, so click
Patternand enter.*tabby.*to find the target class for a tabby cat.- If you know the class ID directly you can also enter that in the
Target Class IDfield. (or check the class map lookup tables)
- If you know the class ID directly you can also enter that in the
- Click
Generateto create saliency maps for both classes:
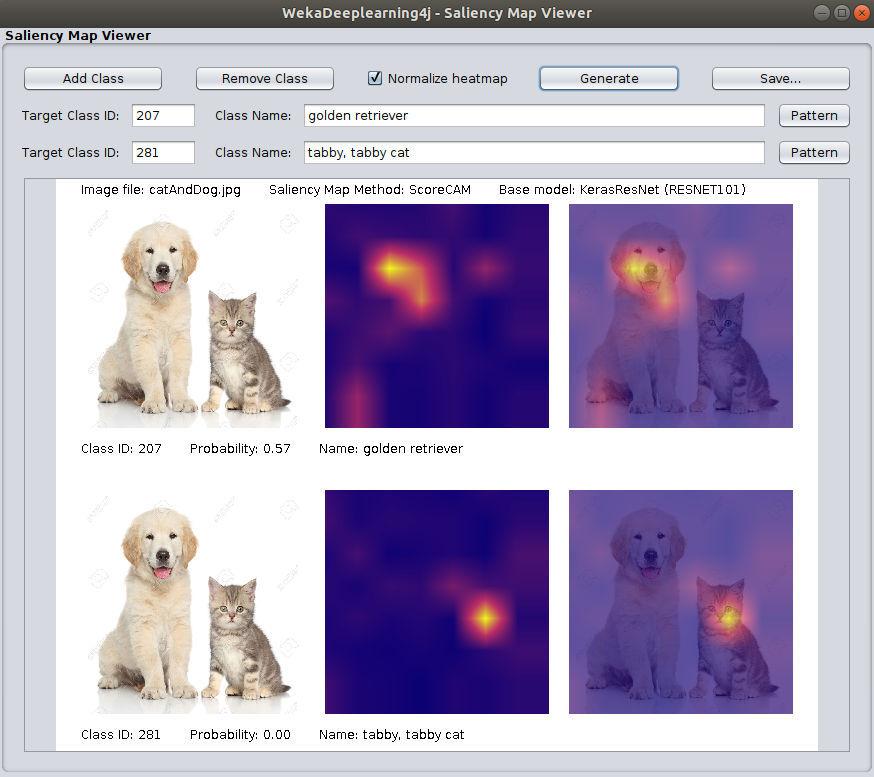
As we can see, the model is correctly looking at either animal to make its prediction, depending on whether we're targeting the dog or cat!
Class Map Lookup Tables
- IMAGENET
- IMAGENET - Darknet 19 - Darknet19 was pretrained on an altered version of IMAGENET, hence the different class map.
- VGGFACE
Command Line
To generate a saliency map from the command line, you must specify an output image location.
When specifying a target class, we can specify it as -1; the saliency map generator
will simply use the max probability class as the target class in this case. This is useful when you don't
know what the class ID may be.
$ java weka.Run .Dl4jCNNExplorer \
    -i "$WEKA_HOME/packages/wekaDeeplearning4j/src/test/resources/images/catAndDog.jpg" \
    -generate-map \
    -saliency-map ".WekaScoreCAM -bs 8 -normalize -output output_image.png -target-classes -1" \
    -zooModel ".KerasResNet -variation RESNET101"
Multiple Classes
$ java weka.Run .Dl4jCNNExplorer \
    -i "$WEKA_HOME/packages/wekaDeeplearning4j/src/test/resources/images/catAndDog.jpg" \
    -generate-map \
    -saliency-map ".WekaScoreCAM -bs 8 -normalize -output output_image.png -target-classes -1,281" \
    -zooModel ".KerasResNet -variation RESNET101"