Feature Extraction
Instead of training a full neural network on your dataset, you may like to try using a pretrained model as a feature extractor and fitting a simpler model to those features. This technique (implemented with the Dl4jMlpFilter) uses the neuron activations from a layer within the model to convert your image dataset into a numeric form - any classical ML algorithm can then be fit to this new form.
Extra Information
Default Feature Extraction Layer
During feature extraction, the output activations from the designated feature extraction layer are used to create the 'featurized' instances.
All zoo models have a default feature extraction layer, which is typically the second-to-last layer in the model (e.g., Dl4jResNet50's
default feature layer is set to flatten_1). The second-to-last layer tends to give the most meaningful
activations, hence why it's set to the default.
Concatenating Activations
As previously mentioned, by default the filter takes features from the final dense/pooling layer of the model (before the classification layer).
You can also configure the filter to use any intermediary layer and concatenate the activations.
Activation Pooling
An important parameter when using intermediate layers is the filter's PoolingType.
Activations from intermediate layers are often 3-dimensional for a given instance, so they need
to be reduced into a 1-dimensional vector.
There are 4 pooling methods currently supported:
- PoolingType.MAX (default)
- PoolingType.AVG
- PoolingType.SUM
- PoolingType.MIN
These pool the 2nd and 3rd dimension into a single value, i.e., activations of
[512, 26, 26] (512 26x26 feature maps) are pooled into shape [512]. You can also specify PoolingType.NONE
which simply flattens the extra dimensions (aforementioned example would become shape [346112]).
PoolingType does not need to be specified when using the default activation layer - the outputs are already the correct dimensionality ([batch size, num activations]). If using an intermediary layer the outputs will typically be of size [batch size, width, height, num channels].
All datasets/models referenced in this tutorial can be found in the asset pack
Starting Simple - Feature Extraction with the MNIST dataset
The following example walks through using a pretrained ResNet50 as a feature extractor on the MNIST dataset and fitting a model using a standard WEKA classifier to this transformed dataset. This only takes 1-2 minutes on a modern CPU — much faster than training a large neural network from scratch.
The steps shown below split this into two steps; storing the featurized dataset, and fitting a WEKA classifier to the dataset. They can be combined into a single command with a FilteredClassifier, however, the method shown below is more efficient as the dataset featurizing (which is the most expensive part of this operation) is only done once (it would be done 10 times using 10-fold CV with a FilteredClassifier). Saving the featurized dataset separately also makes it much faster to try out different Weka classifiers.
GUI
- Open the
mnist.meta.minimal.arffin the Weka ExplorerPreprocesstab viaOpen File. - Select the the
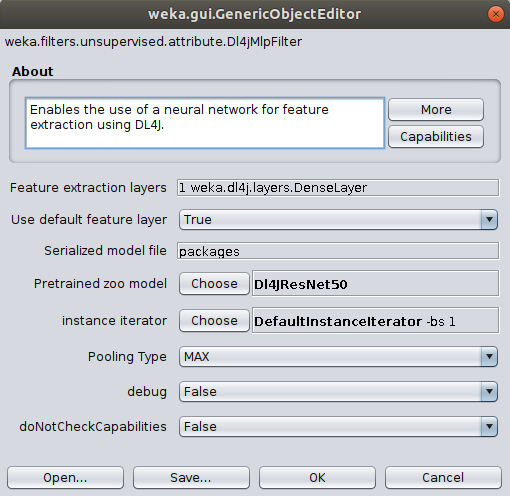
Dl4jMlpFilterin the filter panel (withinfilters/unsupervised/attribute). Click in the properties box to open the filter settings.
-
Set up the
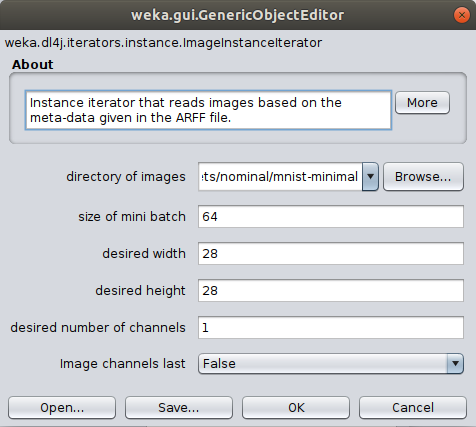
ImageInstanceIteratoras we did in the previous tutorial, setting thedirectory of imagesas themnist-minimal/imagesdirectory containing the actual image files. Thewidth,height, andchannelsare automatically set based on the zoo model's input shape (further explanation). -
(Optional) Set the batch size according to your machine's capability; this won't change the end result but will make processing faster. If you run into memory issues then use a smaller mini-batch size.
- If running on CPU then set to your machine's thread count.
- If running on GPU then set to a square number appropriate for your GPU's memory (e.g., 12GB GPU memory could set batch size to 32).
For now lets leave the Zoo model and feature extraction layer as their default values. Dl4jResNet50 is already selected as the feature extractor model, and will by default use the final dense layer activations as the image features.
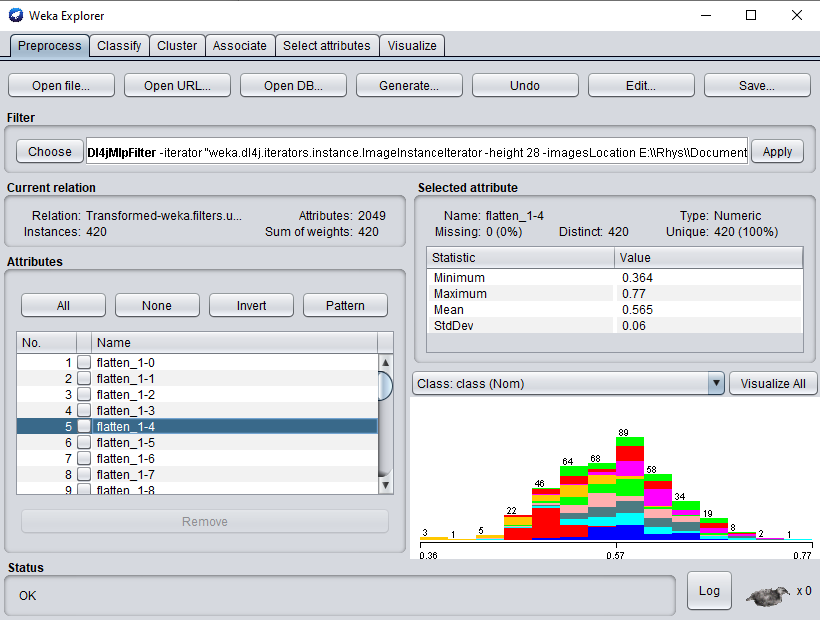
- Click
Applyto begin processing your dataset. After completion, you should see your newly processed dataset!
- Switch to the
Classifytab and selectfunctions>SMOas the classifier. - Click
Startto start training on your newly transformed dataset.
You should get ~89% accuracy - certainly not SOTA but given the simplicity and speed of the method it's not bad! It should be noted that the training dataset size is very small (~400 instances) and also that the ResNet50 weights are trained on ImageNet, which is a very different domain to MNIST
(classifying cars, animals, etc. vs classifying handwritten digits).
Commandline
It should be noted that because we're using the default extraction layer for this model, we can simply specify the -default-feature-layer flag. This is especially useful if trying a range of different zoo models and one wants to avoid specifying layer names for each one.
$ java -Xmx8g weka.Run \
    .Dl4jMlpFilter \
        -i $WEKA_HOME/packages/wekaDeeplearning4j/datasets/nominal/mnist.meta.minimal.arff \
        -o mnist-rn50.arff \
        -c last \
        -decimal 20 \
        -iterator ".ImageInstanceIterator -imagesLocation $WEKA_HOME/packages/wekaDeeplearning4j/datasets/nominal/mnist-minimal -bs 4" \
        -zooModel ".Dl4jResNet50"
        -default-feature-layer
We now have a standard .arff file that can be fit to like any numerical dataset
$ java weka.Run .SMO -t mnist-rn50.arff
Java
This uses reflection to load the filter so all the DL4J dependencies don't need to be on the CLASSPATH -
as long as WekaDeeplearning4j is installed from the Package Manager, weka.core.WekaPackageManager.loadPackages will load
the necessary libraries at runtime.
// Load all packages so that Dl4jMlpFilter class can be found using forName("weka.filters.unsupervised.attribute.Dl4jMlpFilter")
weka.core.WekaPackageManager.loadPackages(true);

// Load the dataset
weka.core.Instances instances = new weka.core.Instances(new FileReader("datasets/nominal/mnist.meta.minimal.arff"));
instances.setClassIndex(1);
String[] filterOptions = weka.core.Utils.splitOptions("-iterator \".ImageInstanceIterator -imagesLocation datasets/nominal/mnist-minimal -bs 12\" -poolingType AVG -layer-extract \".DenseLayer -name flatten_1\" -zooModel \".Dl4jResNet50\"");
weka.filters.Filter myFilter = (weka.filters.Filter) weka.core.Utils.forName(weka.filters.Filter.class, "weka.filters.unsupervised.attribute.Dl4jMlpFilter", filterOptions);

// Run the filter, using the model as a feature extractor
myFilter.setInputFormat(instances);
weka.core.Instances transformedInstances = weka.filters.Filter.useFilter(instances, myFilter);

// You could save the instances at this point to an arff file for rapid experimentation with other classifiers via:
// https://waikato.github.io/weka-wiki/formats_and_processing/save_instances_to_arff/

// CV our Random Forest classifier on the extracted features
weka.classifiers.evaluation.Evaluation evaluation = new weka.classifiers.evaluation.Evaluation(transformedInstances);
int numFolds = 10;
evaluation.crossValidateModel(new weka.classifiers.functions.SMO(), transformedInstances, numFolds, new Random(1));
System.out.println(evaluation.toSummaryString());
System.out.println(evaluation.toMatrixString());
Results
Using SMO gives us 89% accuracy - certainly not SOTA but given the simplicity and speed of the method it's not bad!
It should be noted that the training dataset size is very small (~400 instances) and also that the ResNet50 weights are trained on ImageNet, which is a very different domain to MNIST
(classifying cars, animals, etc. vs classifying handwritten digits).
=== Stratified cross-validation ===
=== Summary ===

Correctly Classified Instances         374               89.0476 %
Incorrectly Classified Instances        46               10.9524 %
Kappa statistic                          0.8783
Mean absolute error                      0.1611
Root mean squared error                  0.2736
Relative absolute error                 89.4975 %
Root relative squared error             91.2069 %
Total Number of Instances              420

=== Confusion Matrix ===

  a  b  c  d  e  f  g  h  i  j   <-- classified as
 39  0  0  2  0  0  0  0  0  0 |  a = 0
  0 46  1  0  0  0  0  0  0  0 |  b = 1
  2  0 37  0  0  0  1  0  1  0 |  c = 2
  1  0  0 40  0  1  0  0  0  2 |  d = 3
  1  1  1  0 36  0  0  0  0  2 |  e = 4
  0  0  0  3  0 33  0  1  1  0 |  f = 5
  0  0  0  0  0  0 41  0  0  0 |  g = 6
  0  0  0  2  1  0  0 38  0  3 |  h = 7
  1  0  0  2  0  4  0  1 32  1 |  i = 8
  1  0  1  0  3  1  0  4  0 32 |  j = 9
Activation Layer Concatenation and Pooling
We'll now walk through some more advanced customization options in the Dl4jMlpFilter; additional feature extraction layer concatenation, which allow you to use features from any layer in the model, and the PoolingType parameter, which specifies how extra dimensions should be pooled.
GUI
- Select
Dl4jResNet50as the feature extractor model. - Set
Use default feature layertoFALSE- if this is not done, only the default extraction layer will be used. - Open the
Feature extraction layersproperty, and open the properties for theDenseLayer.
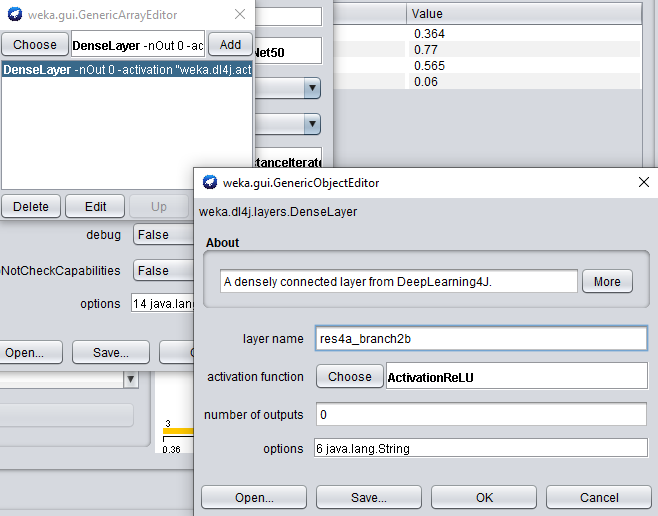
When adding another feature extraction layer, only the layer name property needs to be set.
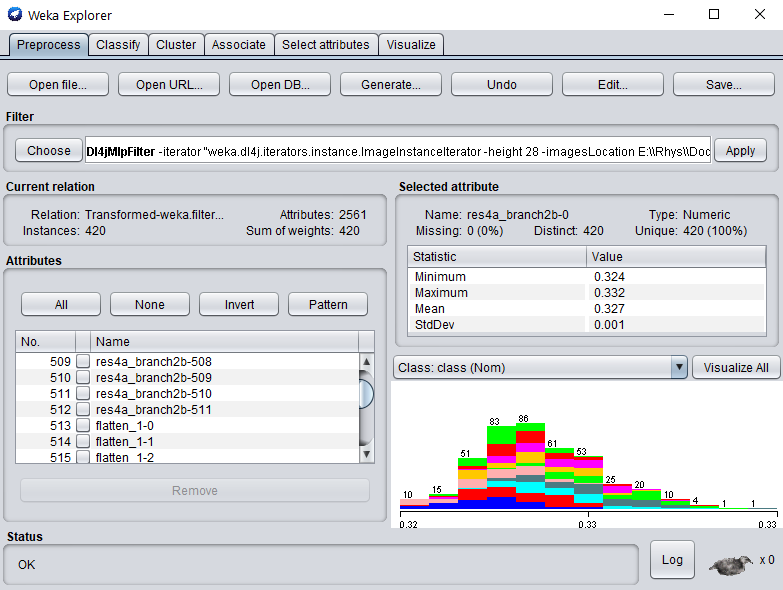
- Set the layer name property to res4a_branch2b, and add the layer to our list.

The outputs from the default feature layer are already in 2 dimensions: [batch_size, activations].
The outputs from res4a_branch2b, however, are 4-dimensional: [batch_size, channels, width, height]. This means that the Pooling Type property will be used to pool these extra dimensions (as explained at the beginning of this tutorial).
The default type is MAX, but for the sake of this tutorial we're going to use AVG
- Change the
Pooling Typeproperty toAVG.
We're good to go! Apply the filter to begin processing the dataset; after completion, you should see your newly processed dataset!
As before, we can fit any off-the-shelf WEKA classifier to this numerical dataset - no further processing required.
- Switch to the
Classifytab and runSMOon our newly transformed datset - adding this extra layer may increase the accuracy very slightly!
Commandline
$ java -Xmx8g weka.Run \
    .Dl4jMlpFilter \
        -i $WEKA_HOME/packages/wekaDeeplearning4j/datasets/nominal/mnist.meta.minimal.arff \
        -o mnist-rn50-concat.arff \
        -c last \
        -decimal 20 \
        -iterator ".ImageInstanceIterator -imagesLocation $WEKA_HOME/packages/wekaDeeplearning4j/datasets/nominal/mnist-minimal -bs 4" \
        -poolingType AVG \
        -zooModel ".Dl4jResNet50" \
        -layer-extract ".DenseLayer -name res4a_branch2b" \
        -layer-extract ".DenseLayer -name flatten_1"
We now have a standard .arff file that can be fit to like any numerical dataset
$ java weka.Run .SMO -t mnist-rn50-concat.arff
Java
// Load all packages so that Dl4jMlpFilter class can be found using forName("weka.filters.unsupervised.attribute.Dl4jMlpFilter")
weka.core.WekaPackageManager.loadPackages(true);

// Load the dataset
weka.core.Instances instances = new weka.core.Instances(new FileReader("datasets/nominal/mnist.meta.minimal.arff"));
instances.setClassIndex(1);
String[] filterOptions = weka.core.Utils.splitOptions("-iterator \".ImageInstanceIterator -imagesLocation datasets/nominal/mnist-minimal -bs 12\" -poolingType AVG -layer-extract \".DenseLayer -name flatten_1\" -layer-extract \".DenseLayer -name res4a_branch2b\" -zooModel \".Dl4jResNet50\"");
weka.filters.Filter myFilter = (weka.filters.Filter) weka.core.Utils.forName(weka.filters.Filter.class, "weka.filters.unsupervised.attribute.Dl4jMlpFilter", filterOptions);

// Run the filter, using the model as a feature extractor
myFilter.setInputFormat(instances);
weka.core.Instances transformedInstances = weka.filters.Filter.useFilter(instances, myFilter);

// You could save the instances at this point to an arff file for rapid experimentation with other classifiers via:
// https://waikato.github.io/weka-wiki/formats_and_processing/save_instances_to_arff/

// CV our Random Forest classifier on the extracted features
weka.classifiers.evaluation.Evaluation evaluation = new weka.classifiers.evaluation.Evaluation(transformedInstances);
int numFolds = 10;
evaluation.crossValidateModel(new weka.classifiers.functions.SMO(), transformedInstances, numFolds, new Random(1));
System.out.println(evaluation.toSummaryString());
System.out.println(evaluation.toMatrixString());
Results
Adding this extra layer increased the accuracy very slightly! Try playing around with some other layers/classifiers/pooling types to try improve the accuracy even further.
=== Stratified cross-validation ===

Correctly Classified Instances         376               89.5238 %
Incorrectly Classified Instances        44               10.4762 %
Kappa statistic                          0.8836
Mean absolute error                      0.1611
Root mean squared error                  0.2736
Relative absolute error                 89.521  %
Root relative squared error             91.2207 %
Total Number of Instances              420

=== Confusion Matrix ===

  a  b  c  d  e  f  g  h  i  j   <-- classified as
 39  0  1  1  0  0  0  0  0  0 |  a = 0
  0 46  1  0  0  0  0  0  0  0 |  b = 1
  1  0 37  1  0  0  1  0  1  0 |  c = 2
  1  0  1 39  0  1  0  0  0  2 |  d = 3
  0  1  1  0 37  0  0  0  0  2 |  e = 4
  0  0  0  2  0 34  0  1  1  0 |  f = 5
  1  0  0  0  0  0 39  0  1  0 |  g = 6
  0  0  0  1  1  0  0 39  1  2 |  h = 7
  1  0  1  2  0  1  0  1 33  2 |  i = 8
  1  0  0  0  3  1  0  4  0 33 |  j = 9
Further Experiments
Now that we've shown you how to perform feature extraction, it's up to you to have a play with the different options available in WekaDeeplearning4j.
- Load in your own dataset (or one of the extra datasets provided in the asset pack)
-
Alter some options in the
Dl4jMlpFilter- Try some of the different pretrained models
- Add some extra activation layers. Check out the model summary for your model to get the correct layer name. The attributes are named after the layer they were derived from, so more investigation can be done around which layer provides the most informative features (e.g., using the
Select Attributespanel in WEKA). - Try different pooling modes and see what (if any) can improve over the default
MAXpooling mode.
-
After altering the
Dl4jMlpFilteroptions, try some other WEKA classifiers (e.g.,RandomForest) and try beat the accuracy achieved withSMO!